This is a quick how-to post for setting up an experiment with Eyelink 1000 eye tracker and Presentation software.
Special thanks to Maarten van den Heuvel, at the Max Planck Institute, Nijmegen, who kindly sent me the scripts and the help guide which, will be available in a folder that you’ll download in a minute.
I recently collected data for an experiment in the scanner that used Eyelink 1000 eye tracker. I used Presentation software to present my stimulus and record participant responses. If you are planning to do something similar, you’ve come to the right pocket of the internet. First, download and extract a folder that has a help guide, and the necessary subroutines for Presentation from here.
Note: I work at the Donders Institute, so these notes are primarily written to run experiments here. If you’re somewhere else, I hope this will still be of some use to you.
What do I need?
- This folder - download link
It’s the same folder from above. Just reminding you to download it. -
PresLink
This is an extension provided by SR Research’s team, and is already setup at DCCN’s MRI lab. If you’re not at Donders, take a look at “Before you begin” section in the help guide (you’ll find it in the folder that you’ve downloaded under the name “PresLink_help_file.pdf”). -
Knowledge of the port numbers linking your stimulus PC and Eyelink PC
Your lab manager should have all the answers. - Some subroutines that interact with Eyelink
You’ll find them in the folder that you just downloaded.
So, how does this work?
For a simple experimental, which does not include manipulating stimulus based on gaze direction, or eye coordinates, or any data from Eyelink PC, the setup is quite straightforward. You only need to:
- start recording eye tracker data
- present stimulus and run experiment
- stop recording eye tracker data
You’ll have to do the following:
-
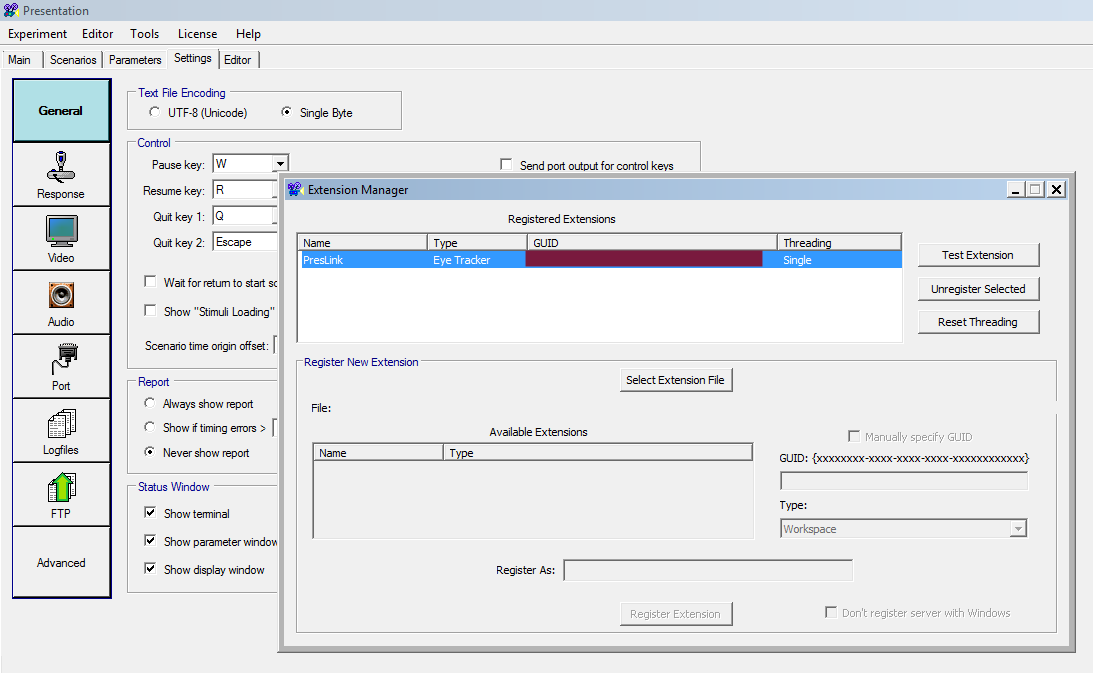
Add PresLink to Presentation.
This is already done at DCCN’s MRI stimulus PC. But open your Presentation experiment, and check Tools > Extension Manager, which should have a registered PreLink extension.
-
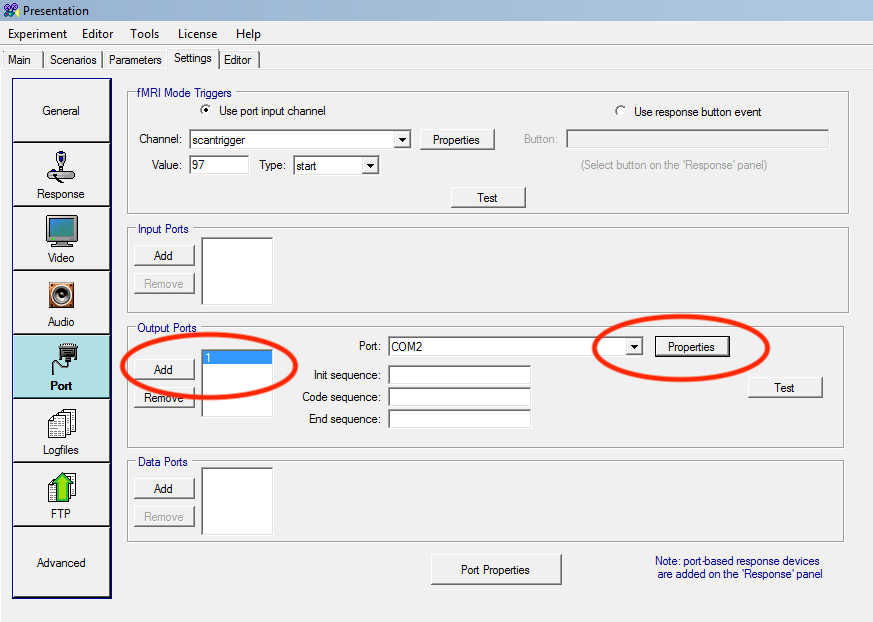
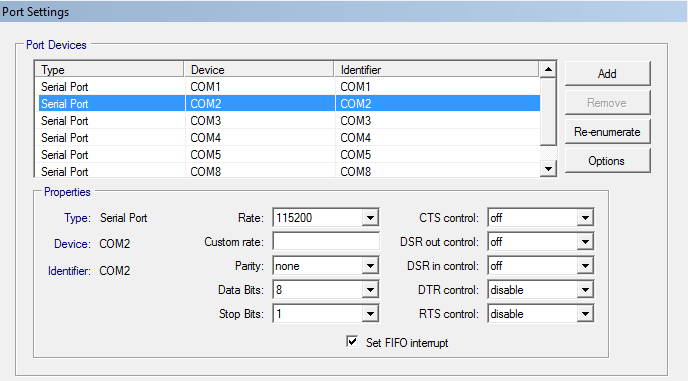
Add output port to ensure Eyelink and stimulus PC can “talk”.
At the DCCN, output port that can send triggers from your stimulus PC to your Eyelink PC is COM port 2. Here are the settings that I used -

-
Add eye tracker subroutines to your pcl file.
This is essentially one line in your pcl file. I called the file “proj_caudal_PFC_presentation_eyelink_SUBS.pcl” for my project. Feel free to call it however you see fit. A copy of the file is in the folder under the name “EyelinkSUBS.pcl”:
include "proj_caudal_PFC_presentation_eyelink_SUBS.pcl"; -
Define your output filename and initialise PresLink
Note:There is an 8-character limitation on your EDF (that’s the file extension Eyelink uses) filename. I used “sub_1”, “sub_19” and so on. One line each.
- Calibration and other details
- I had issues getting Eyelink version automatically. So, I hardcoded it in the subroutines file.

- I also experienced issues with getting screen sizes automatically.

- Did calibration using an external tool available on stimulus PC.
- I had issues getting Eyelink version automatically. So, I hardcoded it in the subroutines file.
-
Add lines to send output trigger for important events (like beginning of a trail).
Note:At the DCCN, every button press (at least of the first two buttons, I’ve been told) is automatically sent to the eye tracker PC. So, choose a number that’s more than 2, when sending your trial-relevant trigger.
So, start by defining your port:
output_port eye_tracker_port = output_port_manager.get_port(1);
I only used 1 output port. If you’re using multiple ports, enter the correct number in the paranthesis.
Then, add this line to send the trigger:
output.send_code(4);
Here, 4 was my code to denote the begining of a trial. - Stop recording - this will also export your eye tracking data to your desired location (default: logfile directory).

And that’s about it! You should have a working eye-tracking setup with Eyelink 1000 and Presentation now. If anything is unclear, feel free to send me a tweet or an email.